4. Baselines Models
Train a Baselines model specific to the layout of your documents, if the preset Layout Recognition struggles to segment and identify lines
Previous step: Manual Layout Editing
The default Layout Recognition tool (Universal Lines) works well for most document typologies but may not be as accurate with documents with complex layouts, such as registers, annotated documents, postcards, etc.
When the default Layout Recognition is unsatisfactory for your documents, you can train a Baselines model specific to your document typology. After the training, you can apply your customised Baselines model to your documents, which will be segmented following the examples you provided for training.
Before starting training a Baseline model, remember the difference between it and a Field Model. Field Models recognise the structure (like text regions) of your documents automatically, enriching them with structural tags. On the contrary, a Baselines model detects only the lines but has the advantage of being specifically trained on the layout of your documents. For this reason, it should be more accurate than the default Universal Lines model.
The first step is to prepare the pages on which to train the Baselines model. A good number to start with is 50 pages, but the model efficiency depends on the complexity of the layout. After the first training with 50 pages, you could decide if the Baselines model is good enough or if it needs more training material.
To prepare the pages, it is only necessary to segment, automatically or manually, the text regions and the baselines. Depending on the layout complexity, there are three options to segment the pages:
- Run the default automatic Layout Recognition.
- Open the page and draw the Text Regions manually using the "Add Region" button to the left of the image. Run then the automatic Layout Recognition to detect the lines; before running it, remember to uncheck the "Find Text Regions" option in the Configure settings. Finally, go through the pages and correct the lines manually.
- Open the page and draw both the Text Regions and the Baselines manually.
Which option to choose depends on the document type and how poorly the default automatic Layout Recognition performs.
No transcription is required to be added to the pages before the Baselines model training since it focuses only on the baselines, and the presence of transcribed text is irrelevant.
Once the 50 or more pages are segmented, it is time to train the Baselines model.
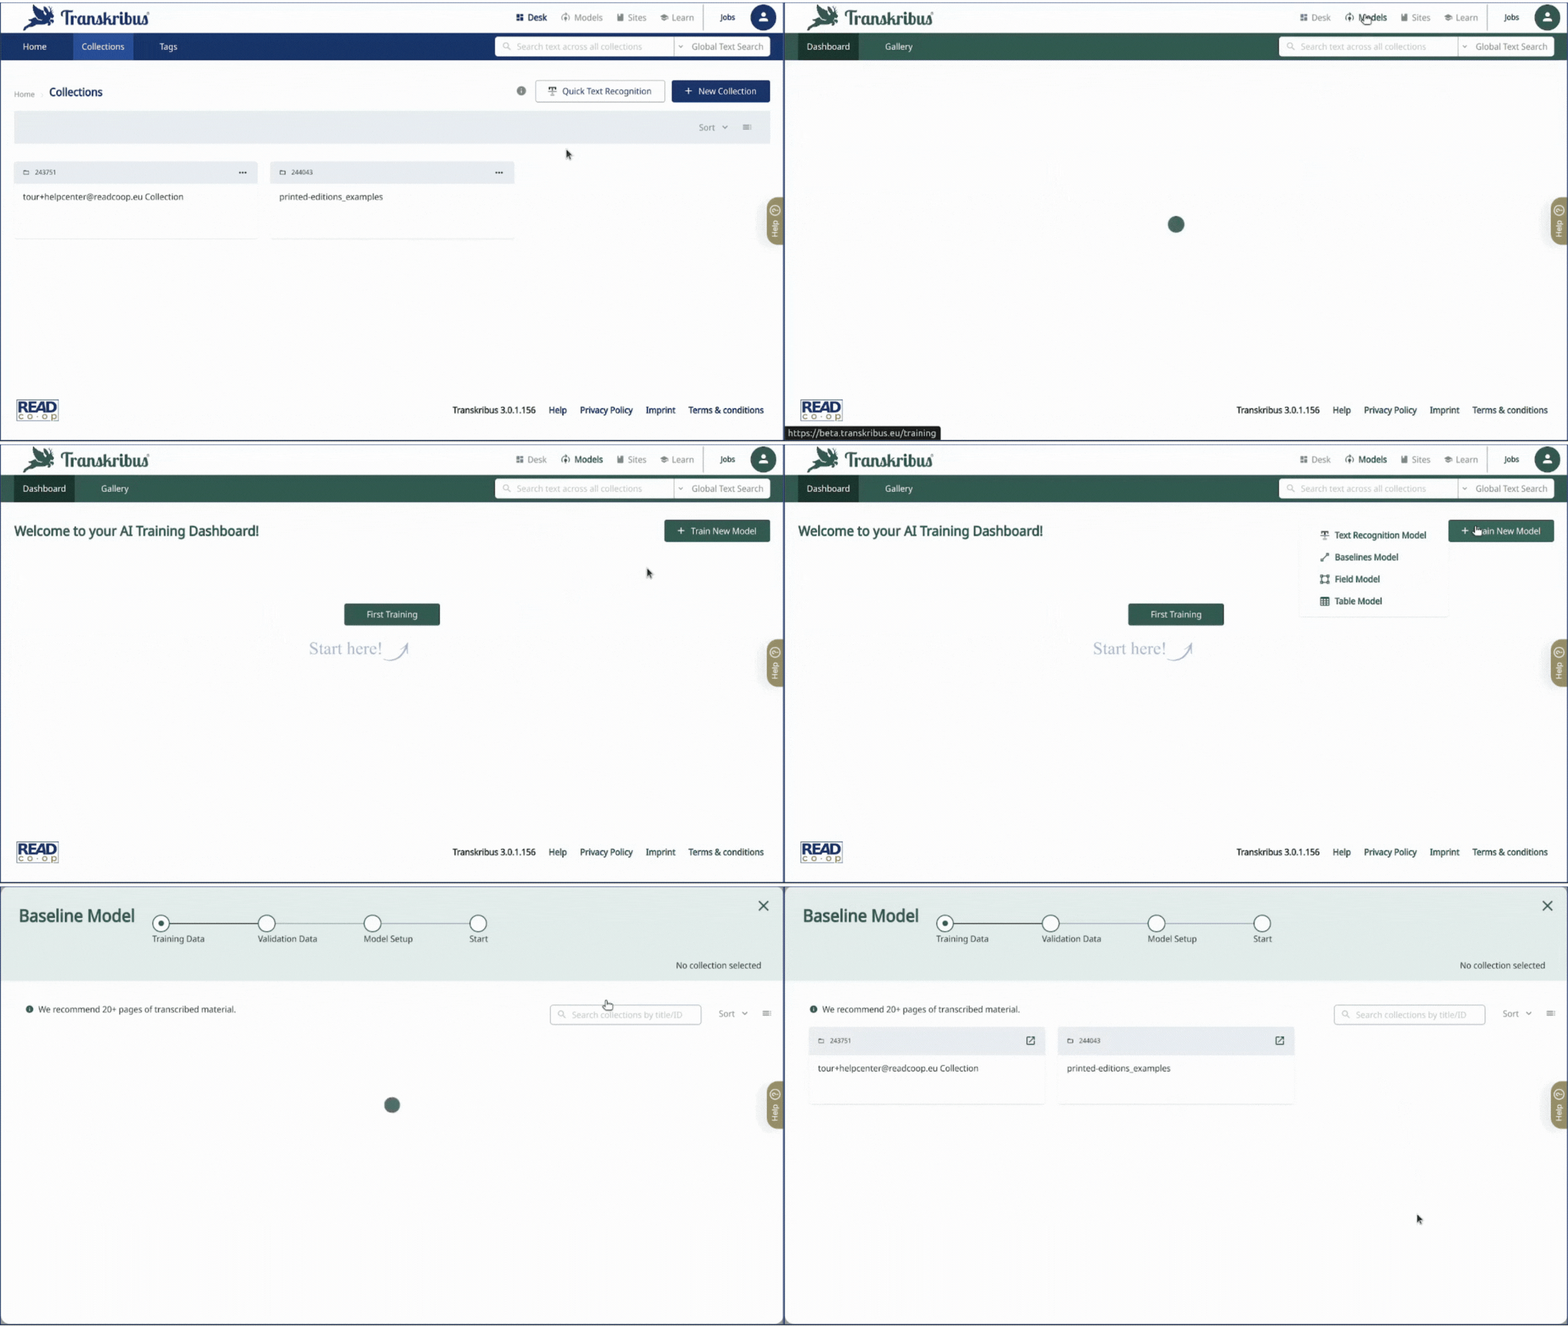
Click on the "Models" tab in the top bar, to the right of "Desk". This area is dedicated to the training of all the Recognition models (text, baselines, tables and field): in this case, choose Baselines Model.

Then, you need to select the collection containing the pages with the corrected layout. You can also type the collection title or collection ID in the search bar to find it.
- You can also select you document(s) in the Desk before entering the training menu. Just select the document(s) or the pages to train and then click on the "Train Model" button over the preview.

After having chosen the collection, the proper training setup starts.
The training setup is made of four steps: training data, validation data, model setup and summary & start. You can go to the next or the previous step whenever you want by using "Next" and "Back" buttons.
Please note that training data and validation data are two different parts of the same dataset, both made of Ground Truth pages:
- Training Data: set of examples used to fit the parameters of the model, i.e. the data on which the knowledge in the net is based. The model is trained on those pages.
- Validation Data: set of examples that provides an unbiased evaluation of a model, used to tune the model's parameters during the training. In other words, the pages of the Validation Data are set aside during the training and are used to assess its accuracy.
Step 1. Training Data
On this page, you can choose the document(s) or the pages to include in the Training Data.
By ticking the box near the document's title, you can select all the pages available in the document. The pages which do not contain any lines can not be selected.
By clicking on "Select Pages" in the document preview, you can choose which pages to use as training set. Once you have done, click on "Save and go back" to return to the Training Data menu.
If you have any doubts and want to check again the pages before selecting them, click on the document preview: this will open the document in a new browser tab.You can then decide which page version to use for the training: the Latest Transcription or Ground Truth only.

With the first option, all the latest edits, regardless of how they were saved, are displayed and can be selected for training. If you choose "Ground Truth only", only the pages saved as Ground Truth are selectable.
Step 2. Validation Data
Choose the pages to assign to the Validation Data.
You can select the pages manually or assign them automatically.
The manual selection works as described above for the Training Data. Only the pages that contain lines and have not been included in the Training Data are selectable.
With the automatic selection, 2%, 5% or 10% of the Training Data is automatically assigned to the Validation Data: in this case, simply click on the percentage you want to assign. The automatic selection is recommended to have more varied Validation Data.
Step. 3. Model Setup
Now that you have selected the training set, all you have to do is add some information about your model. You can also select some advanced settings. On the right, you can see the Model Preview, which will present you model once it is ready to be used.
The first information you are asked to enter is the model name (chosen by you) and a description of your model. Unlike text recognition models, for a layout model it is not necessary to specify the characteristics of the document (e.g. language, material, period). However, we suggest you give a brief description of the format and layout of the documents.
Then, you can also add an image as a preview of the model. Paste a URL to choose one.
You can optionally manage the advance settings. For baseline models this means to choose the number of Training Cylces. It refers to the number of times that the learning algorithm will work through the entire Training Data and evaluate itself on both the Training and the Validation Data. The Training Cycles have to be between 10 and 500. We suggest to choose 100 cycles: this quantity works well for most baselines model trainings.
Step 4. Summary & start
Your model is ready to be launched. Here you can see the summary of the whole setup: dataset, information and settings.
After checking all the details, click "Start" to launch the training. You can follow the progress of the training by clicking the "Jobs" button in the top bar to the left of you user icon. The completion of every cycle will be shown in the job description, and you will receive an email when the training process is completed.
Depending on the amount of training material, your training might take a while. In the "Jobs" window, you can check your position in the queue (i.e. the number of trainings ahead of yours). You can perform other jobs in Transkribus or close the platform during the training process. If the Job status is "created" or "running", please don't start a new training, but just be patient and wait.
Using your customized model
After the training is finished, you can use the Baselines model to recognise the layout of your documents. Select the page(s) or the document(s) to process; then click on "Recognize" on the tool bar and switch to the Layout option. Instead of using the Universal Lines model, choose the Baselines model you trained. You will find it in "Private Models". You can also see a description of the training results on the right.
Among the model's details, you see the accuracy percentage: it is the Loss on the Validation Data. It measures the percentage amount of pixels classified incorrectly and indicates how the Baselines model performs on new pages that it has not been trained on. Results with a Loss of 10% or below mean that the Baselines model is effective.
Once the recognition jub is finished, open the page(s) and you will see the baselines in the image(s).
Next step: Advanced Layout Configuration Settings
Transkribus eXpert (deprecated)
The default Layout Recognition tool (Preset Model) works well for most document typologies but may not be as accurate with documents with complex layouts, such as newspapers, postcards, registers, annotated documents, etc.
When the default Layout Analysis is unsatisfactory for your documents, you can train a Baselines model specific to your document typology. After the training, you can apply your customised Baselines model to your documents, which will be segmented following the examples you provided for training.
Before starting training a Baseline model, remember the difference between it and P2PaLA. P2PaLA recognises the structure of your documents automatically, enriching them with structural tags. On the contrary, a Baselines model detects only the baselines but has the advantage of being specifically trained on the layout of your documents. For this reason, it should be more accurate than the default Layout Analysis recognition tool.
The first step is to prepare the pages on which to train the Baselines model. A good number to start with is 50 pages, but the model efficiency depends on the complexity of the layout. After the first training with 50 pages, you could decide if the Baselines model is good enough or if it needs more training material.
To prepare the pages, it is only necessary to segment, automatically or manually, the text regions and the baselines. Depending on the layout complexity, there are three options to segment the pages:
- Run the default automatic Layout Analysis that you find under the “Tools” tab and then correct it manually using the Canvas Menu.
- Draw the Text Regions manually using the “+TR” button in the Canvas menu. Then, under the “Tools” tab, run the automatic Layout Analysis to detect the baselines: before running it, remember to uncheck the “Find Text Regions” option. Finally, go through the pages and correct them manually using the Canvas Menu.
- Draw both the Text Regions and the Baselines manually, using respectively the “+TR” button and the “+BL” button in the Canvas Menu.
Which option to choose depends on the document type and how poorly the default automatic Layout Analysis recognition performs.
No transcription is required to be added to the pages before the Baselines model training since it focuses only on the baselines, and the presence of transcribed text is irrelevant.
Once the 50 or more pages are segmented, it is time to train the Baselines model. Click on the “Tools” tab. Under the “Model Training” section, click on “Train a new model”. The Model Training window pops up, and on the right, you can choose which engine to train: for the Baseline model, please select “Baselines.”
Before starting training, enter the name and the description of your model. You can also modify the training parameters, i.e. the number of epochs and the learning rate. For the first training and if you are not familiar with machine learning, do not change these parameters.
You need then to select the pages you want to use to train the model, i.e. the pages you previously segmented into text regions and baselines. On the left, select the whole collection or the relevant pages. Click the Training button in the centre to add the selected pages to the Training Set. If you want to consider only the pages with Ground Truth status, select “Ground Truth only” in the drop-down menu on the right, under “Overview”.
Do the same for the Validation Set. The Validation Set should be around 10% of the Training Set, so we suggest, for the first training, including 45 pages in the Training Set and 5 pages in the Validation Set. If you want to automatically assign a percentage of the Training Set to the Validation Set, tick a percentage in the “automatic selection of validation set” option before clicking the “Training” button.
After completing this phase, you can start training the Baselines model by clicking on the “Train” button. Depending on the amount of training material, your training might take a while. Click on the “Jobs” button to check the Job status or your position in the queue (i.e. the number of trainings ahead of yours). You can perform other jobs in Transkribus or close the platform during the training process. If the Job status is "created" or "running", please don't start a new training, but just be patient and wait.
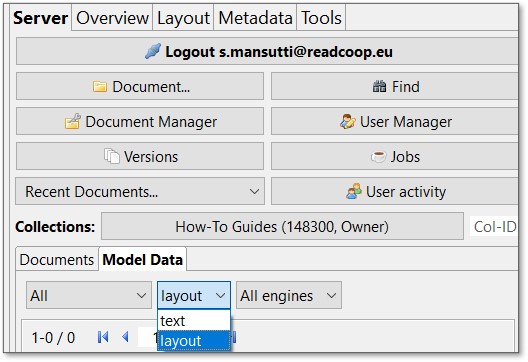
When the training is finished, the Baseline model will appear in the “Server” tab, under “Model Data”. To see it, please select “layout” instead of “text” as model output type in the second drop-down menu.

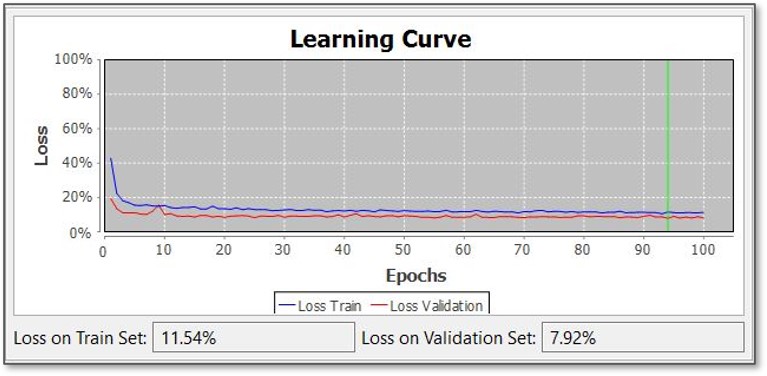
Double-clicking on the Baseline model name, you will see all the details and its learning curve. The “Learning Curve” graph shows the Baseline model’s accuracy. The x-axis indicates the number of Epochs, i.e. the number of times that the training data is evaluated. The y-axis measures the Loss, i.e. the percentage amount of pixels classified incorrectly. The program trains itself first on the Training Set; then, it tests itself on the pages of the Validation Set. For this reason, there are two lines in the graph. The blue line indicated the progress of the training; the red line indicated the progress of the evaluation on the Validation Set. Note that it is important that the two curves do not differ too much. If the two curves diverge, it is most likely that the Training Set differs too much from the Validation Set and the resulting model is not effective.
Underneath the graph, the two percentages indicate how the Baseline model performs on the Training Set and the Validation Set in terms of Loss. The Loss on the Validation Set is the most significant value because it indicates how the Baseline model performs on new pages that it has not been trained on. Results with a Loss of 10% or below mean that the Baseline model is effective.

To apply the trained Baseline model to your documents, go to the “Tools” tab. Under the “Layout Analysis” top section, click “Configure”. The “Layout Analysis Configuration” window pops up: here, you can choose the Baselines model you trained.
In combination with the Baselines model, it is also possible to change the Layout Analysis settings (minimal baseline length; baseline accuracy threshold; use trained separators; max-dist for merging baselines; number of text regions). Read more about those settings on the Automatic Layout Recognition page.
Finally, click the “OK” button at the bottom of the “Layout Analysis Configuration” window. Your trained model has now been selected.
In the “Tools” tab, choose the pages on which to segment and click the “Run” button: the Layout Analysis job will now start. You can check its progress by clicking on the “Jobs” button under the “Server” tab. Once the job is finished, reload the page/pages and the text regions and baselines will appear in the images. No credit will be used to apply the Baseline model to your documents.
