
Previous step: Manual Layout Recognition
Our Table Models make the digitisation process more efficient and user-friendly. Customise your Table Models to suit your unique documents by adjusting how tables are recognised and data is extracted. This guide will first explain how to train a powerful Table Model, and then how to use the Table Model once it has been trained.
How to use the trained Table Model
Evaluate your Table Model (mAP)
When dealing with tables in your document, the appropriate approach in Transkribus depends on the frequency and layout of the tables:
- Tables that are consistently present throughout the entire volume or many pages and have the same or a similar tabular structure: train a table model, as described below.
- Tables that appear sporadically or are embedded in the text: draw them manually using the editor functions (just steps 1-3 of Step 1 - Preparing the Training Data).
How to Train a Table Model
Step 1: Preparing the Training Data
Table Models are not an all-in-one or out-of-the-box solution. They are designed to be trained on a certain document or collection to recognise its specific table layout. However, with enough training data, table models can be trained to recognise a few different types of tables at once.
The Training Data you need depends on the type of table(s). We recommend selecting a sample from the entire volume/collection, not just the first few pages, to have more variety and train a more robust model:
- easy tables: 20 pages of Ground Truth
- difficult tables (uneven rows, skewed tables, a table across two slightly off-set pages...): 50 pages of Ground Truth
- mix of different tables: between 50 and 100 pages of Ground Truth, depending on the number of tables
Table models can be trained even when the separators (that define the columns and rows) are not visible and when the height of the rows varies. However, they may encounter difficulties with very narrow rows and columns, which increases the likelihood of them being overlooked. Table models can also deal with skewed tables as long as the skewness is not excessive.
After choosing the pages to use as the Training Data, draw the tables manually following these steps:
-
In the Transkribus editor, select the "Add Region" button on the left-side menu and then "Add Table Region." Click on the image once to start the table and once to finish it.
-
To create columns, select the table and hold V while moving the cursor across the page and clicking wherever you want to create a column.
- To create rows, select the table and hold H while moving the cursor across the page and clicking wherever you want to create a row. Keep going until all the cells are marked.
- Save the page as Ground Truth and move to the next one.
Good-to-know tips:
- To draw columns and rows with a custom angle, select the table, hold C and use the arrow keys to change the angle.
Hold C+CTRL and use arrow keys to draw more precise angles. - If the table layout of several pages is similar, you have the option to copy and paste the table structure from one page to the others. Simply select the table, press CTRL+C, navigate to the next page, and press CTRL+V. Remember then to adjust the table to fit the image.
We recommend performing this task after drawing the columns but before drawing the rows, as the rows tend to vary more from one page to another and adjusting them manually may take more time. - Table models can be trained to ignore specific columns, consider multiple columns as one column, or even create columns/rows when they are only separated by white space and there are no visible separators. Consistency in creating the Ground Truth and including a sufficient number of pages, covering all the different cases that the model needs to recognise, is crucial.
To receive proper training results please make sure to have only one table per page and no merged table cells within your Ground Truth.
Please note: Tables created in the eXpert Client cannot be rendered in the Web App. When working with tables, it is recommended that you only work with the Web App.
Step 2: Training the Table Model
The training setup is made of four steps: Select data, Model Setup, Training parameters, and Start. You can go to the next or the previous step whenever you want by using "Next" and "Back" buttons.
Please note that training data and validation data are two different parts of the same dataset. Training Data is a set of examples used to fit the parameters of the model (the model is trained on these pages). Validation Data is a set of examples that provides an unbiased evaluation of a model (these pages are used to assess its accuracy).
Step 1: Select data
Open the collection with the data you prepared and select the specific documents you want to use as your training data.
Click the pointing-down arrow, select "Train Model" and choose "Table Model".
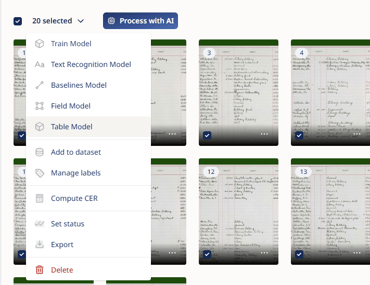
You can choose to include in the training the last version of all pages (with text regions) or to restrict the dataset to the Ground Truth pages.
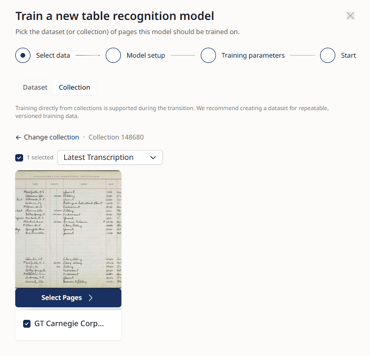
To personally select the pages to include in the training set, click on "Select Pages" (on the document preview image). This menu shows you a list of the pages with a small preview: you can select or deselect the single pages. Click on "Save and go back" to continue the training setup.
Step 2: Model setup
Here, you have to add some information about your model.
- Target Collection: the collection your model will be linked to.
- Model Name: Choose a name for your new model; for example, you can use a couple of words that explain the layout your model is meant to recognise.
- Description: Provide a brief description of what kind of material you used as Ground Truth and what the model is for (e.g. 19th-century census records, birth registers).
- Image URL: Optionally, you can add an image that will serve as a preview thumbnail for your model; copy and paste the image URL to do so.
Step 3: Training parameters
You can set advanced options regarding the training process. For initial trainings, it is recommended not to modify these advanced parameters and to adhere to the default advanced options, which have proven to be effective in most scenarios.
- Model Type: This defines the depth of the backbone network used in the Table Model, which is measured in layers. Choosing the Standard option (50 layers) will generate quicker results and is ideal for documents with simpler tables. Selecting the Enhanced option (101 layers) allows your Table Model to deal with more complex tables. However, it requires more processing time and so will take longer to produce results.
- Training Cycles: These cycles indicate how many times (between 1'000 and 10'000) the model will go through the training data to learn and adjust. More cycles could result in a more accurate model, but may also risk overfitting.
- Learning Rate: It defines the increment (between 0.0001 and 0.003) from one cycle to another, so how fast the training will proceed. This will affect accuracy: the higher the value (so the speed), the higher the risk that details are overlooked.
Step 4: Start
Your model is ready for training. Review all the settings and data you have inputted.
By default, your data is split into 90% Training Data and 10% Validation Data. If you want to adjust this ratio or manually choose which pages are used as Validation Data, create a dataset first and start the training from the Datasets section.
Once everything looks good, proceed by clicking "Start training" to launch the training process.
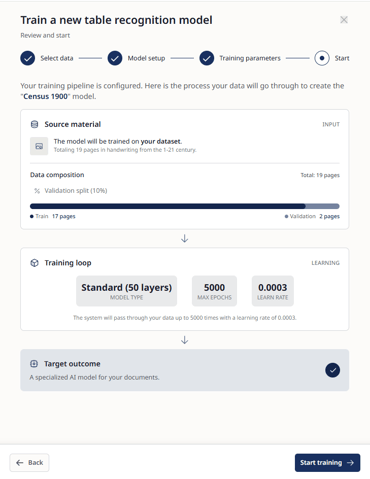
You can follow the progress of the training by clicking the "AI Jobs" in the slide-out on the left side of your Transkribus Home Screen and selecting the "Training" tab. You will receive an email when the training process is completed.
How to Use the Trained Table Model
Once your new Table Model is ready, you can try it out on your documents by following these steps:
Step 1: Apply Table Recognition
- Select the pages or documents in your Collection you want to transcribe.
- Click on the “Process with AI” button next to the selection overview.
- In the side menu, change the Process Type from "Text Recognition" to “Table Recognition.”
- Browse available models in the search field and select your newly trained Table Model.
- Review the required credits against your account balance (Personal/Collection credits).
- Click “Start recognition” to launch the process.
Note: Models perform best on documents similar to their training data. A model trained on a specific table structure will show poor results on different tabular layouts.
Step 2: Apply Layout (Baselines) Recognition
After the table structure (regions, columns, and rows) is detected on your pages, you need to add text baselines within the recognized cells:
- Select your document or pages and click “Process with AI.”
- Set the Process Type to “Layout Recognition.”
- Open the Advanced Settings and configure the following parameters:
- Keep existing text regions: Ensures baselines are detected only inside your newly recognized table regions.
- Split lines on region borders: Prevents baselines from crossing cell boundaries or merging text from adjacent cells.
- Click “Start recognition.”
Additional adjustments to the advanced layout parameters might be required, depending on the specific documents. For a comprehensive overview of all the advanced layout configuration settings, please refer to this page.
If it happens that lines stretching multiple cells are divided, you can merge those partial lines. First, you must move them to the same cell: right-click on the line incorrectly assigned, select "Assign to new region," and double-click on the correct region. Now that both lines belong to the same cell, you can hold CTRL, select both lines, and press M on your keyboard to merge them.
Step 3: Apply Text Recognition
With the table layout and baselines in place, automatically transcribe the text inside the cells:
- Select your pages and click “Process with AI.”
- Leave the Process Type set to “Text Recognition.”
- Choose the appropriate Text Recognition Model for your script or handwriting style.
- Click “Start recognition.”
And that’s it! Your document now contains a fully recognized table structure with transcribed text inside every cell.
Evaluate your Table Model (mAP)
Instead of the CER (Character Error Rate), the accuracy of a Table Model can be assessed by looking at the percentage of the Mean Average Precision.
The Mean Average Precision (mAP) is a complex measure that evaluates how accurately the system detects the tables, considering whether they were detected, and how well their size and shape match the validation data.

Models with mAP over 60% can already deliver very satisfactory results. However we recommend to always run a recognition test with your model and visually evaluate the results yourself.