2. Structural Tags
Use structural tags to divide up your documents into structural sections like paragraphs, headers, marginalia or your customised categories
Previous step: Layout Recognition
Structural tags can be used for Field Models or when you want to restrict the text recognition to certain structure types instead of recognising the whole page.
They can also be helpful when you want to tag the layout elements (text regions and lines) and export this information in the XML alongside the coordinates of each shape.
Structural tags are centrally managed at the collection level, allowing for easy editing and utilisation by all collaborators within the collection.
Step 1:
To work with structural tags, you will first of all need to make them visible. To do this, click on the "Settings" icon located in the menu on the right side of the screen. From there, select "Image". Under the "Visibility" section, you will find two buttons: Show structure labels and Show structure colors. These buttons allow you to to show structure labels and colours and can easily switch these buttons on and off with a simple click. You can also change the label size in the "Scale" section below.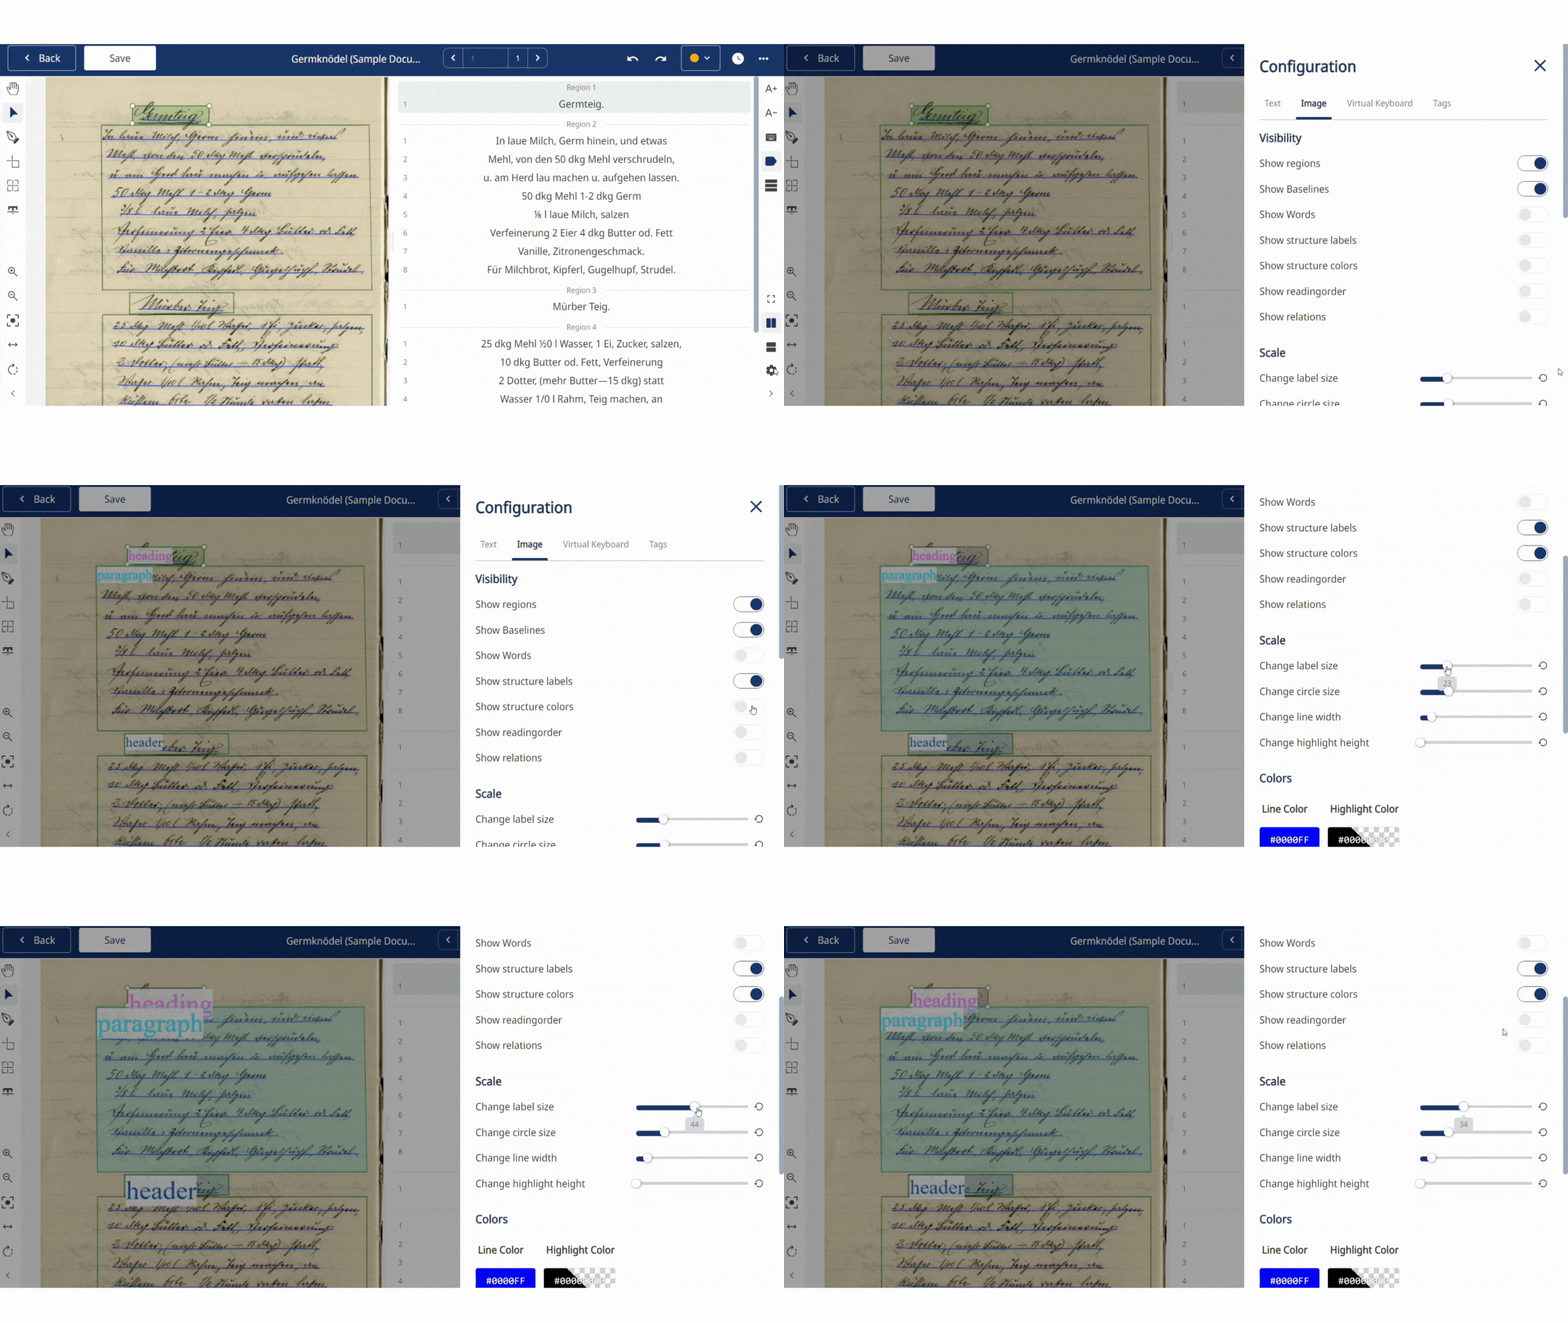
Step 2:
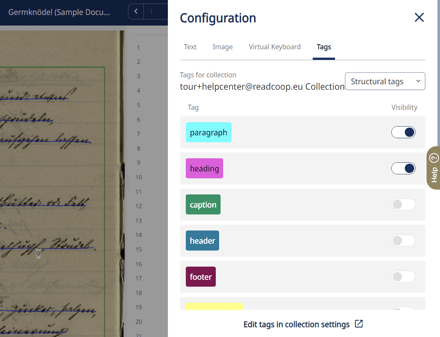
If you want to add and change customised tags, click on the "Settings" icon located in the menu on the right side of the screen and go to "Tags". Here you can choose between "Structural tags" and "Textual tags" and switch tag visibility on or off by clicking on the buttons.
Regarding the default tags, it is not possible to delete or edit them.
However, you have the option to make them visible or not.
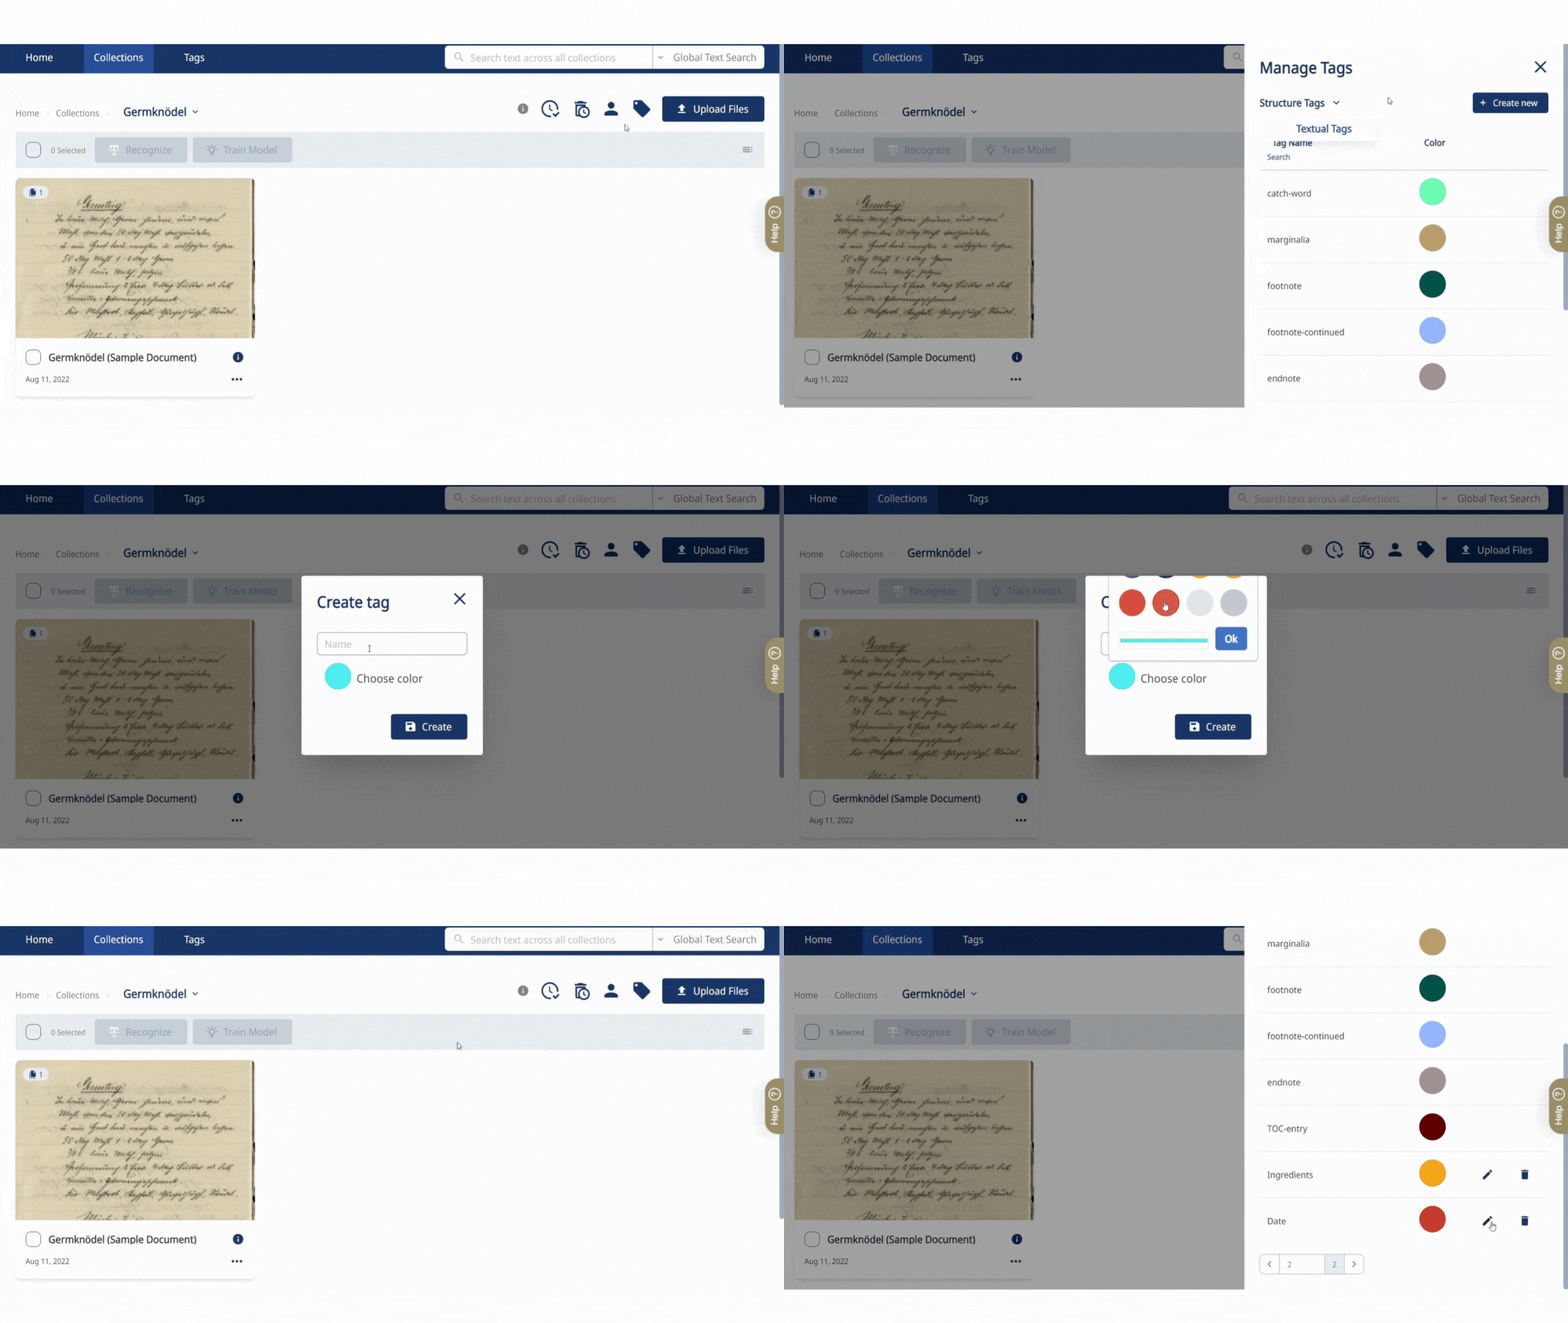
You can also manage the structural tags of a collection through your Transkribus desktop. Open the collection in question and on the left-side “Transkribus organiser” menu, click on Tag Manager. Then, at the top, select “Structure Tags”. Here you can add, edit and remove structural tags.
To add a new tag, click on “Create new”, type the name, choose the colour and click “Create” to save your changes.
Click on the structural tag to edit the name or the colour, or click the “Remove” button to delete it.
Please note that all the changes done here are saved only for the collection in question (the one opened in the background). Other collection users will see and be able to use your newly added or edited structural tags.
Step 3:
To assign a structural tag to a text region or line, select the shape and right-click on it: the first menu item is "Assign structure type". Click on it and choose the relevant tag to assign to the selected shape. Here you will only see the tags you have made visible in Settings. To remove a structure tag from a shape, select the shape and choose "none" from the list of tags.
To assign the same tag to more regions at once, hold CTRL and select the relevant regions, then right-click and choose the structural tag.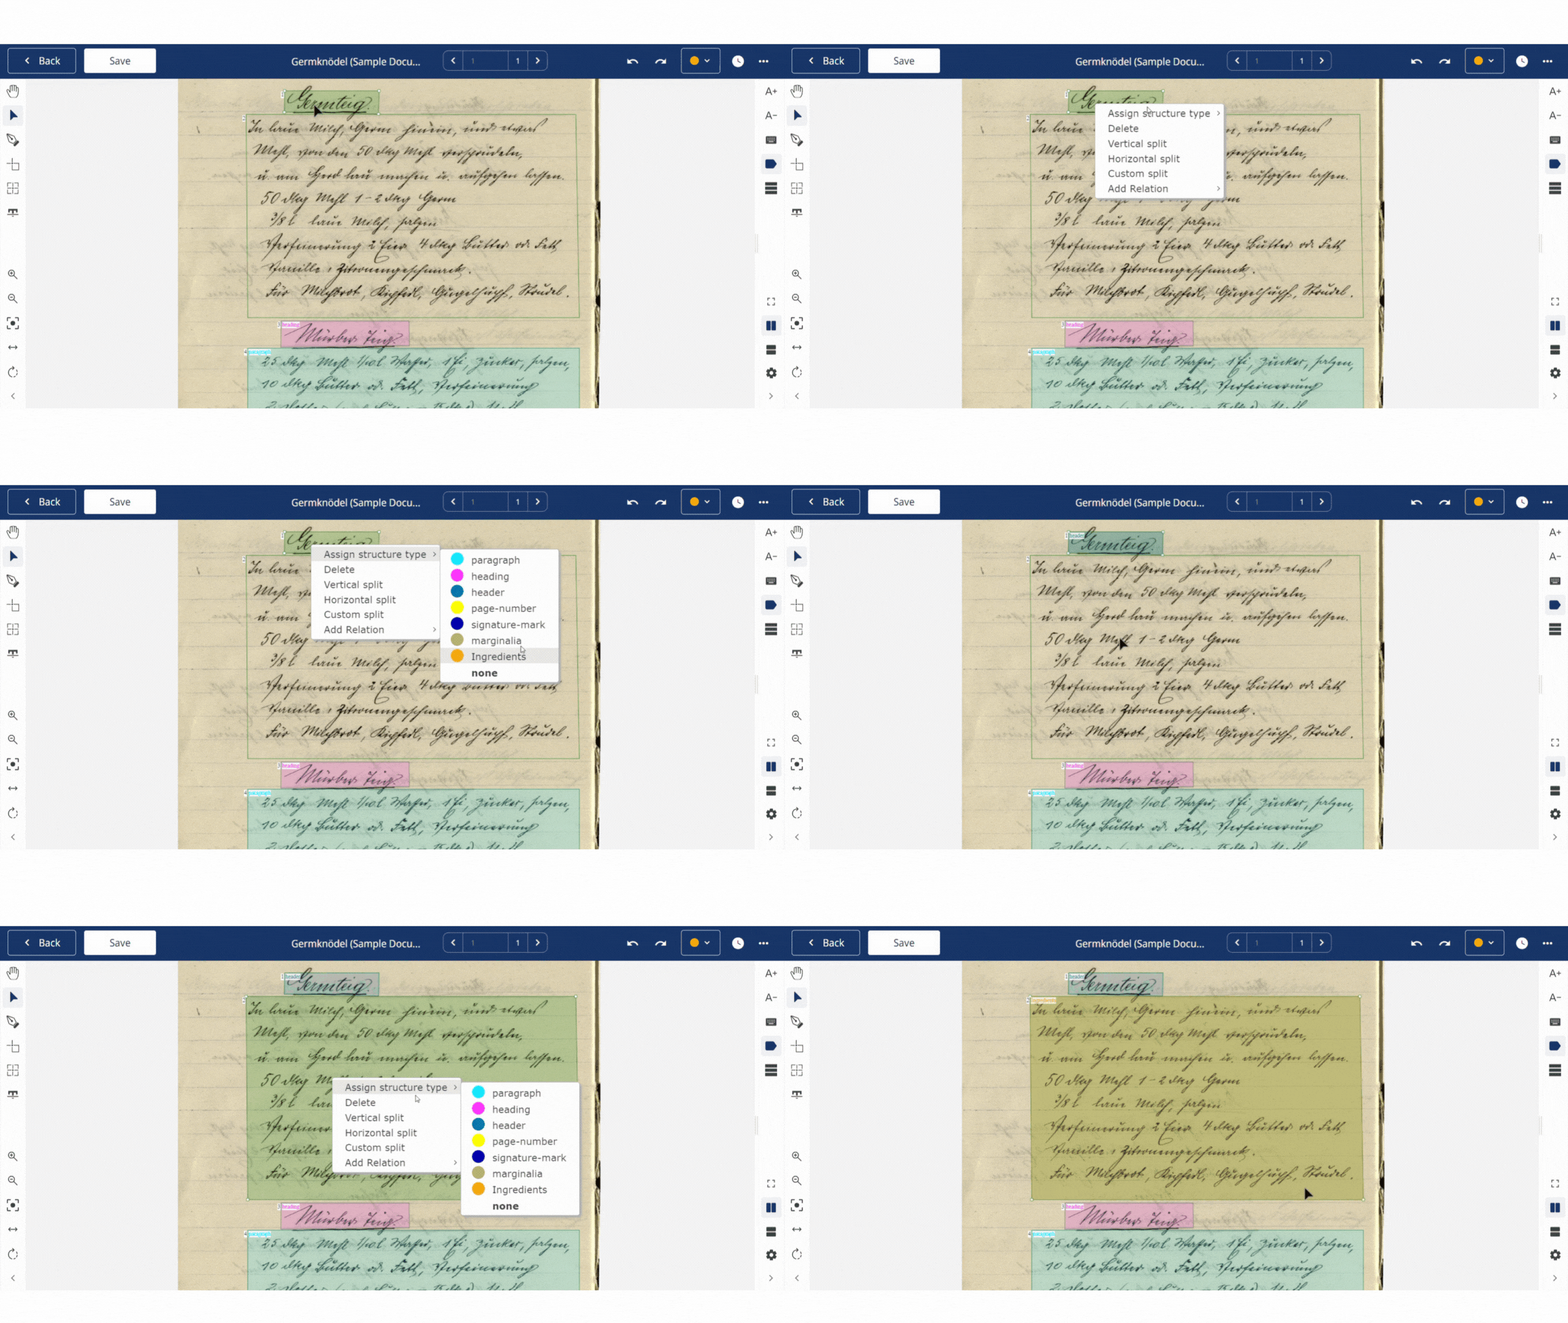
The structural tag information will then be exported in the XML file of the page.
Step 4:
Moreover, it is possible to restrict text tecognition only to the text regions tagged with specific structural tags. After selecting the model, click Advanced settings and select the relevant tags. Unflag the "Delete text from other regions" option to keep the text in the other text regions.
This feature is particularly useful when you need to extract specific text from a particular text region or when you have a combination of handwritten and printed text on the same page, and you want to use separate models for each..gif?width=590&height=332&name=Structure%20tags%20-%20TR%20(1).gif)
Relations
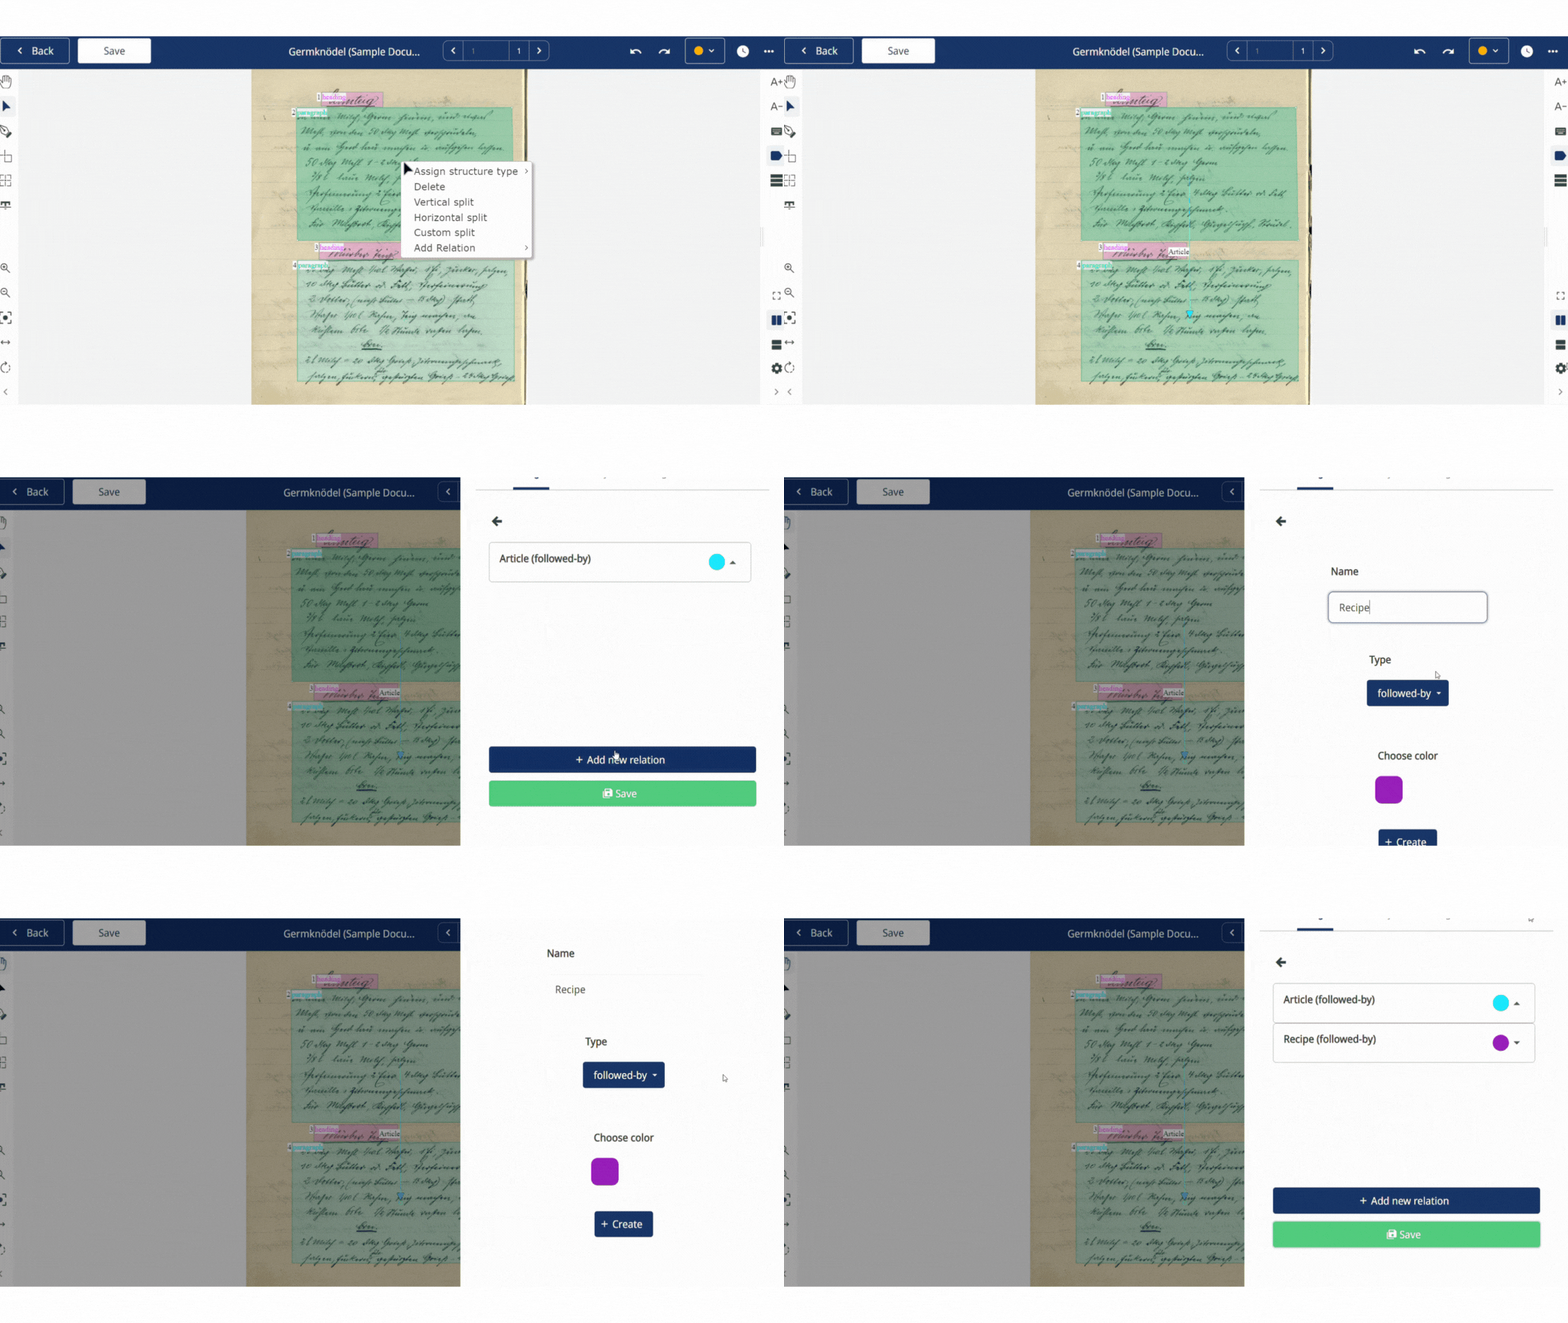
You can also create Relation tags between shapes by right-clicking on them. This allows you to connect layout elements that are related to each other, which can be useful for various purposes. The relational data will also be included in the XML document.
The most common type of relation is the "Article" relation. This relation is useful when an article's text is divided into multiple columns. It allows you to link the different text regions that make up the article and indicate the reading order.
To delete a Relation tag, click on the circle at the centre of the text region where the relation starts or ends and press Delete on your keyboard. You can make circles more visible by enlarging the circle size in the Settings menu.
Next step: Textual Tags
Transkribus eXpert (deprecated)
With structure tags, you can divide up your documents into structural sections like paragraphs, headers or page numbers and also add customized tag categories for your individual needs. Moreover, it is possible to train P2PaLa models to automatically recognise your documents' structure.
It is not possible to save structure tags at the Collection level in Transkribus eXpert.
There is no need to tag every feature of your documents: focus on marking up the sections that you are interested in.
First, open your document in Transkribus eXpert. The structural tagging interface can be found by clicking the “Metadata” tab and then the “Structural” tab. In the centre of the tab, you can see the different predefined structure types.
To create your own tag categories, click the “Customize” button. The “Tag configuration” window will open up. In order to create a new tag category, simply type in the name in the blank box at the bottom of the window, then click the green plus button. In this window, you can also customize the tag colours by clicking on the coloured section next to a tag and then choosing your desired colour. The new tags you created will also be automatically available for all your documents in all your collections.
You can assign tags to text regions and line regions on each page in your document. To place a tag first, click on the “Item visibility” button in the Main menu and make sure that text regions and line regions are visible on your document. Select the text region or line in the image window, right-click the selected shape and then choose the desired tag under “Assign structure type”. Or alternatively, you can add the tag by clicking the green plus button on the right of the desired tag category in the “Structural” tab.
You can select and tag several regions at once by holding down the “CTRL” key on your keyboard and then clicking on your document.
The structural tab also enables you to:
- Assign a “Page type” to each page of your document. Possible options are: Front cover, Back cover, Title, Table-of-contents, Index, Content, Blank, Other. When you have your page open, choose the appropriate definition by clicking the arrow next to the “Page type” options and then choosing the desired type. The page type is not relevant for the P2PaLA training.
- Link two structural tags together with the “Links” buttons, e.g. a link between a line and the footnote connected with that line. The first button is to create such a link, and the second one is to remove it. Please note that for P2PaLA training, the linking of shapes is not relevant.
- Remove a structural tag: select the tagged region and then click the red button;
- Show structural tags names and colours in the image window;
- Click the star button next to each structural tag to access advanced options: here, you can annotate all empty text regions with the structural tag of your choice; delete from all the pages of the document a certain structural tag; rename an assigned structural tag with another name.
- Layout section: here, you find an overview of the structural types in your document and snippets of any transcribed text. You may find it quicker to consult this list rather than search for a particular line or text region in the image. To go to the desired tagged text or line region, double-click the region in the “Layout” section. The image and the Text Editor will automatically jump to this line. The tags you have added will be shown in the “Structure” column. Next to the structure type, there is a small downward arrow. By clicking it, you can quickly change the structure tag; if you click the “delete” (it is the first item of the list), the structural tag will be deleted.
The structural information can also be used for the training of a P2PaLA model, which can automatically recognise the structure of your documents and tag them. Read the P2PaLA page to know how to prepare the training data, train a model and apply it on new pages.
