
Creating a New Project
You can start a new project by clicking on "Projects" in the left sidebar menu and selecting the creation option, or by clicking the "+ New" button in the top-left corner of the interface.
- Basics: Provide a mandatory Title and a descriptive overview (e.g. language, time-frame, record-descriptions) of your workspace. You can also upload a custom project thumbnail or choose from default placeholder graphics.
- Additional project info: Provide optional archival context to help organize your research, including Country, City, Institution / Archive, Document type (e.g., letters, diaries, ledgers).
- Invite team members: Search for and add collaborators by name or email address within your organizational setup.
- Link ressources: Add collections, sites or models to your project to start. You can always modify or add more items later by clicking the "+ Add resource" button in the top-right of your project overview.
Note: Projects can currently only be shared with team members if your account is on a team or organisational subscription plan.
Linking Collections, Models, Datasets, and Sites
Projects are meant to organize and collect all your different data within the Transkribus App into one collaborative workspace. The resources that can be linked to a project are:
- Collections: Link the collections containing your projects documents and pages to your collection. This step will not delete your collection in your collections overview or have any impact on already edited material within your collections.
- Models: Attach public models or your own private models so that all project collaborators can easily access and deploy them for automated text recognition workflows.
- Datasets: Bind specific Ground Truth sets directly to the project workspace to coordinate and model creation and training. For more information on Datasets have a look here: Datasets.
- Sites: Connect your Transkribus Site to your project to prepare your work for publication or to easily access already published data from your project workspace.
Note: A Collection can only be part of one project at a time! If a collection is already assigned, its active project will be displayed next to its name.
Project Visibility
You can configure access permissions to fit your workflow under "Options" by clicking on "Publish your project":
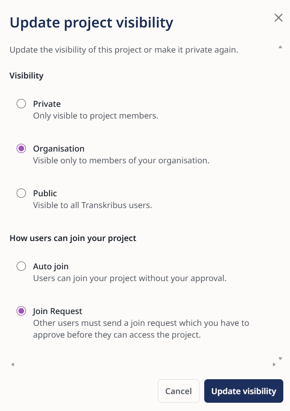
- Private: The workspace and its linked resources remain strictly restricted and visible only to specifically invited project members.
- Organisation: The project is automatically shared with and visible to all registered members belonging to your organizational account.
- Public: The project overview becomes searchable and visible to all Transkribus users across the platform.
- Auto join: Any eligible user can join your project immediately without your explicit approval.
- Join Request: Other users must send a join request, which you have to approve before they can access the project.
Note: Public projects require admin approval before they become visible to all users. You will be notified once your project has been reviewed.
Project Info & Overview
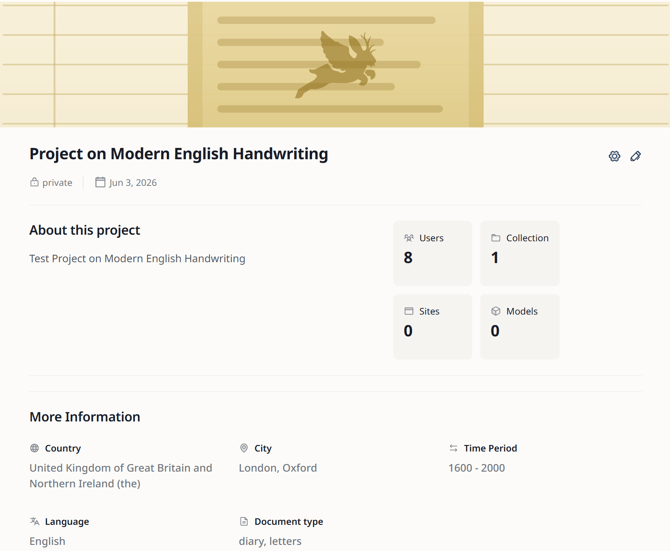
Once established, the main project info page provides an executive summary of your workspace metadata. This is what other users will see when they are invited to the project or once the project is published.
Here you can find the total count of active Users, connected Collections, linked Sites, and available Models, alongside the general description and further information you may have added regarding your project.
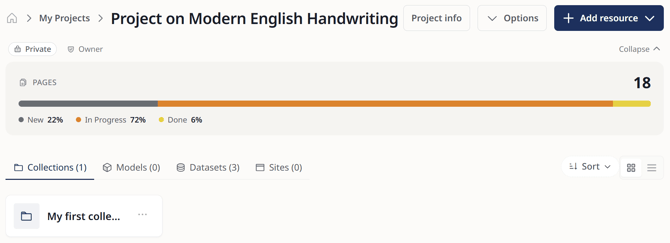
As owner you will automatically be forwarded to the project overview page when entering your project. Here you can see and edit all your added material at a glance:
- The visibilty status of your project, the joining requirements and your role within the project.
-
A page status tracking bar calculates the absolute percentage of pages and their respective status within your connected collections.
- All connected collections, Models, Datasets and Sites.
From here you can access the "Project Info" page, use the "+ Add resources" to connect your data or edit your project under "Options".
By clicking on "Project settings" under "Options" you can change your general project description as well as any further project info. Here you can also add or remove members to your project or change their assigned roles within the project workspace.
Managing Project Members and Roles
You can assign the same roles to members as you can in collections:
- Ownership: There can only be one owner for a project at any given time. However, the current owner has the authority to transfer this role to another existing project member.
- Collection roles: When adding members to your project, they will automatically be added to any linked ressources of your project:
- If they are not yet a member of the linked ressources, they will be automatically added with the same role as set in the project.
- If they are already a member of a collection, dataset or sites, the set roles within the linked ressources remain the same.
- If project roles are edited and changed, these changes automatically apply to the roles of the users within all linked ressources.
- If members are removed from a project, they will automatically also be removed from access to all linked ressources.
More information on the different roles and permissions can be found here: Managing User Roles & Permissions.
A detailed introduction to Projects&Datasets can also be found here:
Next step: Managing Datasets