Previous step: ScanTent
Using the ScanTent together with the DocScan app ensures the quick and efficient capture of high-quality images, without the need for a specialized book scanner - however, the DocScan app can also be used as a simple scanning app without making use of a ScanTent.
You can effortlessly upload images from DocScan directly to the Transkribus platform, where you can harness the power of Handwritten Text Recognition technology.
The DocScan app can be downloaded for free from the Google Play store. It is currently available for Android phones only, but thanks to ifunplay who have integrated an automatic mode into their popular Doc Scan app, the ScanTent now also has support for iOS devices.
Note that the Doc Scan App is currently not available for some Android 16 devices, as an alternative we can recommend the Adobe Scan App.
Main features
- Fast and reliable detection of document pages
- Manual mode for taking individual images separately
- Automatic mode enabling repeated capturing of images (movement is detected automatically)
- Ability to edit images
- Direct upload of documents to Transkribus
Workflow
Step 1: Login
For Transkribus users, it is recommended to log into your Transkribus account within the app. This will allow you to easily upload the scanned documents directly to the platform.
Step 2: Documents
To begin scanning with the DocScan app, you'll need to open a new or existing document.
Here's how:
- Tap the burger menu icon (three lines) located at the top left corner of the app.
- Select Documents in the sidebar and click on the + button which is highlighted in blue to add a new document.
- Give your new document a name.
- Finally, tap Create Document.
All the images you capture after this step will now be assigned to the selected document and uploaded to Transkribus with this name. However, if you do not open a new or existing document, your images will be stored under a document called "Untitled document".
Step 3: Scanning
Once you have created or selected a document, you can start scanning!
Position your phone on the smartphone mount on top of the ScanTent:
- Important: your smartphone's display needs to be aligned with the reading direction of the document. To ensure high-quality scans, make sure that you can easily read the messages displayed on the DocScan app while standing in front of the ScanTent.
- DocScan may provide information and guidance regarding the focus, perspective, and positioning of your document while scanning.
- To capture an image, simply tap the Play button.
- The image will be captured as long as DocScan detects no other movement.
- Continue scanning by turning to the next page of your document.
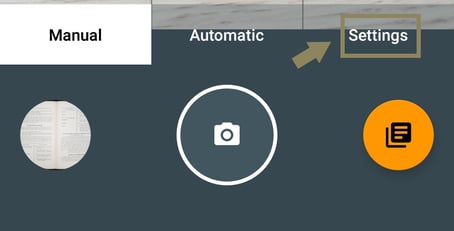
You have the option to manually take individual images or set the app to automatically capture an image each time you turn a page. You can easily select either the "Manual" or "Automatic" options located at the bottom part of the display.
Manual mode
This mode is designed for manual image capture by pressing the Play button. It is useful when a ScanTent is not available and you simply want to capture images of a document.
Automatic mode
This mode is designed for more efficient scanning. When using it, DocScan will automatically capture an image each time you turn a page. If a page has already been scanned, the app will prompt you to turn to the next page. This allows you to have your hands free to easily turn pages and move documents inside the ScanTent.
To be aware of when DocScan automatically captures an image, you can enable the sound on your smartphone. This allows you to hear when the image is taken and turn the page accordingly. You also have the option to flag the Flash after imaging feature in the settings menu. This will briefly activate the flash on your phone to indicate that the image has been successfully captured.
Note: the goal is for you to be able to sit comfortably in front of your ScanTent without needing to constantly check your phone's display.
Continue scanning
You can easily go back to the scanning function at any time by tapping on the burger icon located at the top left corner of the app and selecting Camera.
Step 4: Editing & Cropping
After capturing an image or finishing the automatic scanning process, you have the option to edit your images before sharing or uploading them to Transkribus. Simply tap on the document icon located at the bottom right of the app to select the document and open the editing options.
Automated cropping
The automated cropping function eliminates the need for you to manually adjust the frames. The app automatically positions them for you, saving you time and effort.
To crop your scanned documents, follow these steps:
- Open the document folder containing the scans you want to crop.
- Each page will be displayed within a yellow frame.
- Note: When you activate cropping, a few extra pixels will be added to the yellow frame to ensure the entire page is included in the image.
- Finally, click on the three-dots menu located in the top right corner and select Crop images from the options available to start the cropping process for all documents.
To crop specific images, simply select the files you want to crop by pressing and holding your finger on one image.
Manual cropping and rotating
In some cases, the automatic cropping feature may encounter difficulties with certain types of images. If this happens, you always have the option to manually crop the images yourself.
- To open the document view, click on the file and then select the Cropping and Rotating icon from the editing menu located below.
- To reposition the page boundary around the image, simply drag the corners to the desired location. If you need to rotate the image, just click on the rotating icon found in the top right corner, next to the saving icon indicated by a check-mark.
- After making the necessary changes, tap the check-mark to save your edits. Then, click on Open Document View to crop the images as described above.
Delete images or documents
If you want to delete a single image, simply open the document view and click on the recycle bin icon found in the bottom right corner.
To remove a whole document folder, click on the three-dots menu and select Delete from the list of available options.
Export options
You also have the ability to save your document folders as either PDF or ZIP files. Additionally, you can easily share them with other applications on your phone. To access these features, simply open the three-dots menu and select the appropriate option.
Step 5: Upload to Transkribus
After you have completed the scanning and editing process, you have the option to directly upload your images to Transkribus.
- To upload your desired document, select the three-dots menu and click on the cloud icon in the options menu. You will be prompted to confirm if you want to begin the upload. If there are any uncropped images in the document, you have the choice to cancel or proceed with the upload. It's completely up to you whether you prefer to crop the images before uploading or not.
- Open Transkribus on your computer and you will find your uploaded documents in a collection named DocScan - Uploads. Typically, the upload process takes just a few minutes. However, if you are uploading a large number of pages, it may take a little longer.
Step 6: Settings
To access the general settings area, simply tap on the burger icon (three lines) located at the top left corner of the app and select Settings.
From there, you have the flexibility to customise and adjust settings related to Upload networks, Exif information, and Image processing, according to your personal preferences.
You have the option to enable or disable fast page detection, depending on your desired work speed and your tolerance for potential accuracy loss.
Additionally, you have the option to customise the settings for capturing images.
When using the camera, you have the option to adjust the text orientation, display a grid for better alignment, lock the white balance and exposure values for consistent image quality, and even create a document directly from a QR code.
Potential scenario for institutions: user generated scans
DocScan provides a feature for "crowd-scanning," which allows users to contribute their own scanned images to the digital collections of libraries or archives. This means that individuals can actively participate in preserving and expanding the wealth of knowledge available in these institutions by sharing their own scans. It's a collaborative effort that benefits everyone involved.
Here's how the process could work:
The library or archive creates a QR code with important metadata for a specific record, such as the signature, record identifier, and Transkribus identifier. This QR code is then displayed on the institution's website.
When a user wants to digitise that particular document, they can simply scan the QR code using the DocScan app.
Once the user is finished, both the digitized image and its relevant metadata will be immediately accessible to the library or archive. From there, it can be seamlessly integrated into their digital repository for easy access and preservation.
Credits
We are grateful to the numerous users who have generously provided their valuable feedback, which has greatly contributed to the enhancement of the ScanTent and DocScan app. Your input will continue to play a vital role in improving the functionality and usability of these tools.